
Quick Links
As players make their way across Star Wars Jedi: Survivor's many planets, they will notice a wide range of puzzles for Cal to interact with. Some of these puzzles offer Cal rare rewards that aid the Jedi Knight in his quest, while others offer little more than the achievement of completing them. Many of these challenges offer a quick break from the main story but are meant to be completed quickly and left behind. However, these are not the only puzzles that Star Wars Jedi: Survivor has to offer.
Along with the relatively simple challenges that make up many of Survivor's puzzles, the game contains a limited number of puzzles that are far more complicated and require multiple steps. One of the biggest of these puzzles is found in the Jedha desert and centers around a location known as Wayfinder's Tomb. Cal will benefit immensely from taking on this challenge, getting three new perk slots, an upgrade to BD-2's map system, and Eno Cordova's legendary lightsaber.
Wayfinder Tomb Location in Star Wars Jedi: Survivor

When Cal crosses the desert of Jedha for the first time, he may encounter the Wayfinder Tomb and not even realize it. Found at the center of a series of dilapidated bridges and time-worn structures, the tomb will at first seem to be nothing more than a long-dormant monument.
As is the norm with games made with 'Metroidvania' mechanics in mind, it will appear that Cal will have to return once he has more tools at his disposal. In reality, before Cal can access the treasure beneath Wayfinder's Tomb, he must first complete the 'Three Paths' found around Jedha's Desert.
The three paths are individual sections of the Jedha desert, each containing a rolling ball puzzle, similar to the way the doors unlock in the archive. Once all three paths have been passed, Cal can enter the tomb and claim the rewards.
Look at the Wayfinder's Tomb on the map, Cal can follow the three pillars to find the exact location of each path.
Path of Persistence

Cal can technically complete the paths in any order he sees fit, but the Path of Persistence will likely be the best for most players to start with.

To reach it, follow heading 050 using BD's binocular form from the center of Wayfinder's Tomb.

The goal with each path is to align the track, allowing the ball to move up and into the proper position to activate the final switch. Follow these steps to complete this puzzle:

Step 1: Grapple to the ledge shown in the image above. This will lead call to the entrance chamber. Clear the few Stormtroopers inside, then unlock the shortcut zipline on the right after entering.

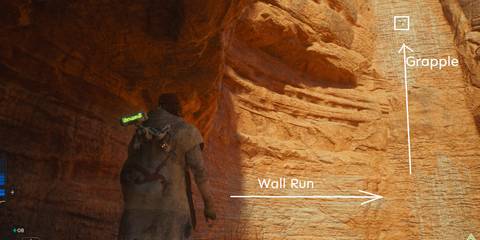
Step 2: Cal will see a wall he can use his 'wall jump' ability on, which leads to a small entrance, and he'll see another small ledge he can grapple to, just to the right of that wall. Grapple up to the ledge on the right, then jump up to reach the next chamber. Note the wall run on the right as Cal enters the second chamber.
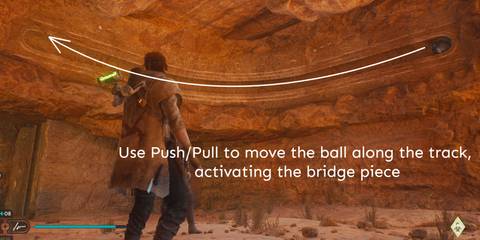

Step 3: Use Cal's pull ability to move the ball along the track at the top of the second chamber. This will move a large stone pillar into place, connecting the track outside and allowing the main ball to reach the top of the structure. When the pillar has moved, Cal can return to the lower chamber through the small hole, then take the shortcut zipline back to the starting platform.

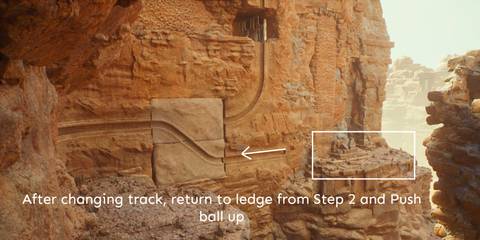
Step 4: Grapple to the ledge shown in the above image. From here, Cal can use his Push ability to push the main ball up the track and to the top of the structure.
Step 5: Cal must head back up and use that wall run he spotted near the second chamber. When he heads up now, the pillar will be blocking it. Use the same track in the second chamber to move the pillar back to its original position, opening up the wall run.
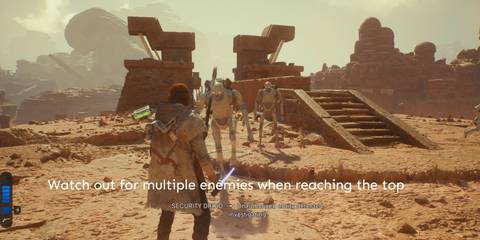
Step 6: Use the wall run, which leads to a grapple that allows Cal to reach the top. Here, Cal will face multiple Stormtroopers, along with two Security Droid Enforcers.

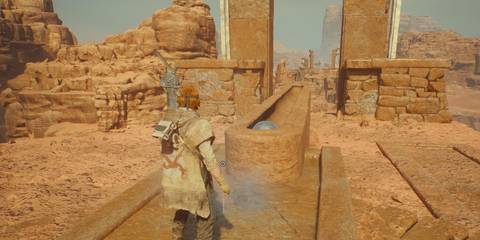
Step 7: Once they are clear, look for the small track at the end of the platform. Use Push to move the ball along the track, completing the Path of Persistence.
Make sure to interact with the Force Essence that comes up from the ground. This will unlock one new perk slot for Cal.
Path of Restoration

If Cal follows heading 160 from Wayfinder's Tomb, he will reach the Path of Restoration. Whereas the Path of Persistence could be completed with Cal's basic abilities, the Path of Restoration seems to require the Dash ability. There are long gaps that Cal must cross, which could prove difficult - if not impossible - without Dash.

When Cal is prepared to take on the puzzle, use the following steps for success:

Step 1: Look for the rock platform shown in the above image. It will have the tell-tale mottled section that marks a climbable path. Once on top, watch for a Stormtrooper on the adjacent platform.

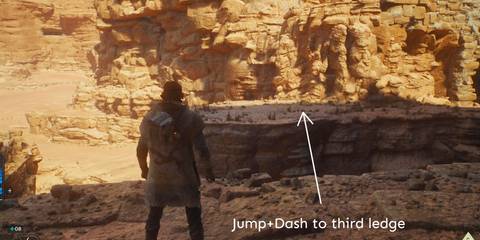
Step 2: Cross the large gap to the next platform. Check the image above for the correct path. Cal will find the entrance to a small chamber with a large enemy inside. Cal can use this to jump down later, so better to clear it out now. From the area outside the chamber, jump across the gap to the platform where the Stormtrooper is/was.


Step 3: From the third platform, Cal will hear more Stormtroopers talking. Look for the ledge in the image to find a lone enemy. This ledge can be clung to and climbed, look for the mottled section. From that ledge, look for the wall run on the right that will take Cal to another ledge at the end.

Step 4: From the ledge on the far end of the area that the wall run led to, Cal will find a track that allows alters the main track in the wall ahead. Use Push to move the ball and watch how the track moves. Cal will now be able to return to an earlier ledge and move the next ball.

Step 5: Head back to the ledge in the image and push the ball up the now available track. This will move a large section of climbable wall down, revealing a chamber Cal can enter. Inside this chamber, he will find a track that allows him to move the final bridge section into place. Cal can reach the top as well at this point, unlocking a shortcut to the lower area. Cal will need this, as the large section of the climbable wall cannot be used when everything is in the final position.
Step 6: Head back to the far ledge and push the ball back to its original position. This will switch the first bridge piece back as well, setting everything into the perfect position for the final Push.

Step 7: Return to the ledge shown above and use Push to move the ball up to the top. From this point, it will work just like the Path of Persistence. Collect Cal's reward, and move to the final Path.
Path of Conviction

The Path of Conviction is the final puzzle Cal must complete before gaining access to the Wayfinder's Tomb. He will need Star Wars Jedi: Survivor's Upgraded Ascension Cable ability before completing it.

This puzzle is tricky because almost all the balls will only remain in place when in their starting position. When moved, they slowly return, requiring Cal to move quickly in order to succeed. Use the following steps to complete the puzzle:

Step 1: Use the first grapple point to reach the main puzzle courtyard. Here, Cal will have access to each track.

Step 2: Get Ball1 into the opposite position. This only works because Ball 1 is the only ball that can be freely moved. Cal will Push the ball on the track to the left, as seen in the above image, then he will use the grapple point to jump to the ledge straight across and push Ball 1 before the track returns to its starting position. Pushing the ball across will reveal another ledge that Cal can reach.

Step 3: Head to the new ledge and test the new ball track Cal can use. This will move the second track piece into place.

Step 4: Return to the starting area and prepare to put a large series of events into motion. This step will require four sub-steps.
- Pull the first ball, causing the first track piece to fall. Immediately grapple across to the high ledge.
- On the high ledge, Pull the ball to set up the second track piece.
- Fall down to the ledge below and Push Ball 1 across into the first track piece. The first track piece will begin to lift as Cal jumps across to the far left corner.
- When the first track piece has risen, the second piece should have a split second of time left. Push Ball 1 up and watch it make its way to the top.

Step 5: Head back to the front of the structure to find two grapple points floating off to the side. Use these to reach a platform. There will be several enemies here.

Step 6: Head to the end of that platform and look for a grapple point on the wall. This will allow Cal to climb to the top. This will once again play out like the previous two Paths. Collect the reward and head to Wayfinder's Tomb in the center of the desert.
How to Collect Wayfinder's Tomb Treasure

Once all three Paths have been completed, Cal and Merrin can head to the tomb in the middle of the desert. When they arrive, they will notice that the sealed tomb is now open, and an elevator waits to take them down into the tomb's main chamber.

Inside the chamber, the group will find two main rewards and a force echo. The first reward will be an upgrade to Star Wars Jedi: Survivor's map, revealing all treasure (priorite shards, Jedha scrolls, Datadiscs).


The second reward will be all pieces of Eno Cordova's lightsaber, one of only a few legendary lightsabers available in Star Wars Jedi: Survivor.
Star Wars Jedi: Survivor is available now for PS5, Xbox Series X/S, and PC.